- Lacoon Mobile Security
Do you need to know what are ios files on Mac and how to access them? Then, you have come to the right page. iOS files are usually found on Apple devices, such as the iPhone, iPad, and iPod touch.
These files contain the operating system and other data necessary for the device to function correctly. When you connect your Apple device to a computer, the IOS files will be transferred to the computer so that you can access them.
What’s The Deal With The iOS Files On Your Mac?
The majority of us use iCloud to back up our iPhone or iPad. You’ve undoubtedly backed up your iPhone or iPad to your Mac if you’ve ever loaded a beta version of iOS on your device or had to restore it.
When installing a public beta, Apple recommends doing so so that if anything goes wrong, you may restore it by simply putting your device into your Mac.
Those backups may take up a lot of space depending on the iPhone or iPad and how much data is saved on it.
What Is The Location Of iOS Files?
iOS backups are kept in a MobileSync folder on both Windows and macOS. iTunes backups are stored at /Users/[USERNAME]/Library/Application Support/MobileSync/Backup on macOS. (Backups are created using Finder rather than iTunes in macOS 10.15, although they are kept in the same location.)
What Are iOS Files?
If you’ve used iOS devices for a long time, you’ve probably backed up your data to your Mac. You might have also used iTunes to find and install iOS applications. It implies that these backups, also known as iOS files, take up a lot of space on your Mac.
Mac > Storage > Manage is where you’ll find your iOS files.
All backups and software update files for iOS devices synchronized with your Mac are included in the iOS files.
While using iTunes to back up your iOS devices’ data is more convenient, all previous data backups might quickly fill up your Mac’s storage space. If you no longer require backups or need to free up space on your computer, the best solutions are to remove old backups or iOS files.
Continue reading to learn how to remove iOS files from your Mac and how to free up storage space.

Related post:
How To Add Spotify Widget iOS 14? How To Get Spotify Premium Free 2022
How To Split Screen On iPhone iOS 14? Best Ultimate Guide Need To Know 2022
How To Play Youtube In Background iPhone iOS 10? Best Full Guide 2022
How To Fix Safari iOS 15 In Less Than 5 Minutes? Best Full Guide 2022
How To Delete Files On Mac
Step 1: Find iOS files. To do so, go to the Apple menu and choose About this Mac from the drop-down menu. After that, navigate to the Storage tab to see what’s taking up storage space on Mac.
If iOS files are taking up a considerable percentage of your storage space, here is where you’ll find out. If that’s the case, you’ll need to transfer or delete backups to free up space.

Step 2: In the left column, choose Manage and then iOS Files. To see the contents of your Mac’s local iOS backup and files.
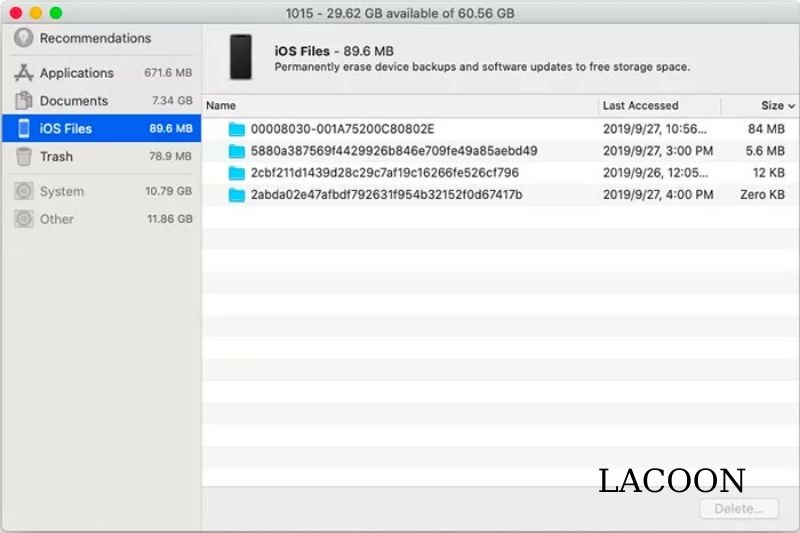
Step 3: If any of the backups are no longer needed, select them and click the Delete button to transfer them to the Trash, then Empty Trash.
You may also back up your data to external storage. To do so, choose Show in Finder and drag the files to an external hard drive or another storage place.
How Do I Organize My Files in iOS?
Organize your documents.
- Go to the Locations page.
- Select iCloud Drive, On My [device], or the name of a third-party cloud provider where you want your new folder to be saved.
- Swipe down from the top of the screen.
- More can be tapped.
- Choose the option to create a new folder.
- Choose a name for your new folder. Then press Done.
How To Access iOS Files On Mac?
AnyTrans allows you to access iPhone files on Mac
On your Macbook, standard techniques only allow you to see the most common file formats. This mostly refers to your images, notes, movies, calendar entries, and other such items. None of these ways allow you to access your iPhone’s system files, which is something you may want to do sometimes.
AnyTrans is an app that allows you to access system files on your iPhone. It’s also the fastest method to access files on a Mac. Apart from that, AnyTrans makes it simple to access common file kinds such as images, notes, contacts, movies, music, etc. Let’s have a look at some of its essential characteristics.
Let’s have a look at how the operation works now.
Step 1: Install AnyTrans on your PC and run it > Use a USB cord to connect your iPhone to your computer > To see additional material on your iPhone with AnyTrans, click the More button.

Step 2: In the left sidebar, scroll down and choose the System option. Your iPhone’s system files will now appear on your Mac.
Step 3: To transfer these files from your iPhone to your laptop, choose the files you want to copy and then click the top-right To Computer option.
Step 4: The files will be copied to your Macbook.
By selecting a relevant option on the AnyTrans main screen, you may access common file kinds such as images and music.
Using the Finder on a Mac, you may access iPhone files.
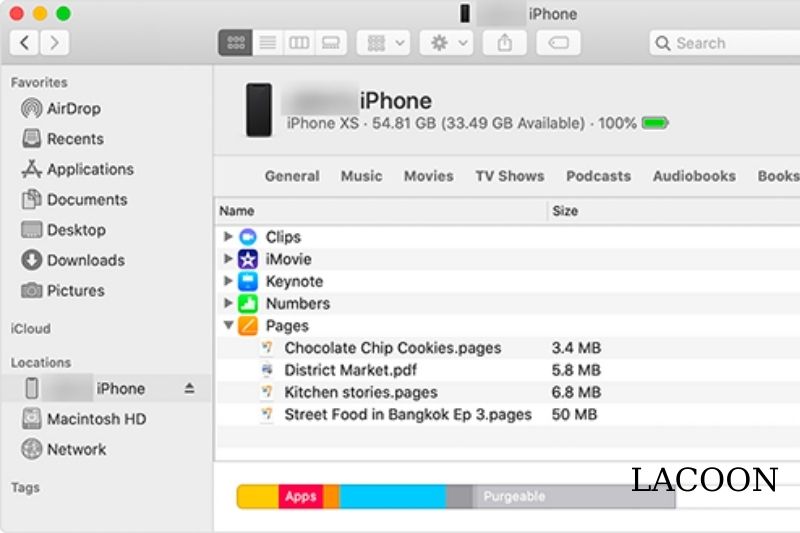
Apple modified the way your iPhones connect with your Mac with the release of macOS Catalina. Previously, you had to use iTunes to access the files on your iPhone on a Mac. Thanks to the Catalina update, you won’t have to do that anymore, which allows you to access iPhone files without using iTunes.
Connect your iPhone to your Macbook or iMac and use the Finder to manage and see your iPhone’s files. This has made it unnecessary to utilize an app to access your files. You may use this approach to retrieve files from your iPhone and view them on Mac and upload files to your iPhone.
If you’ve upgraded your Mac to the newest version of macOS Catalina, all you have to do now is follow the steps below to access your iPhone’s files on your Mac.
- Connect your iPhone to your Mac using a USB connection.
- Open a Finder window.
- Your iPhone will be featured in the Locations section of the left sidebar. To open the files on your phone, click on it.
- All of the files on your iPhone should now be visible in the right-hand pane. You can view what files are accessible on your iPhone by clicking on different file types.
- Drag the files you wish to transfer from your iPhone to a folder in the Finder to copy them to Mac.
- Drag the files you wish to transfer from a Finder window to an app on your iPhone to copy them to your iPhone.
iCloud allows you to access iPhone files
Sharing files and data across your iOS and Mac devices has never been simpler, thanks to iCloud. You may use the same iCloud account on your Mac to see all of your iPhone files if you have an iCloud account on your iPhone. Similarly, you may access the files on your Mac from your iPhone.
All you have to do now is sync your iPhone with all the information you wish to make accessible on your other devices. Your material will be accessible on the iCloud in this manner, and any iCloud-compatible device will be able to access it. This is how you can use a Mac to view iPhone files.
On a Mac, you can browse your iPhone’s files using the built-in Apple programs, or you may utilize the iCloud online version to access your data. None of these items need the download or installation of any software on your computer.
iCloud Sync Your iPhone Files
The first thing you’ll need is to sync the files on your iPhone with iCloud. This can be done directly from your iPhone, but you’ll need a solid Internet connection. All of the file types you choose will be uploaded to the iCloud from your iPhone. The steps to sync your iPhone with iCloud are as follows.
Step 1: Open the Settings app on your iPhone and touch the top banner with your name. To manage your iCloud material, hit the iCloud option on the following screen.
Step 2: Now, you may choose the material you’d want to make accessible on your Mac. If you wish to access your iPhone’s picture files on your Mac, switch on the Photos option.
Step 3: You may enable syncing for various additional file types, including Contacts, Calendars, and Notes.
Using the built-in Mac Apps, you may access iPhone files
You may start viewing your iPhone files from your computer after uploaded to your iCloud account. Using the standard applications that came packed on your Mac is one method.
These applications connect to your iCloud account and allow you to view various files on your computer.
Photos, Notes, Calendars, and other applications fall under this category. You may pick and start an appropriate software to get access to your data, depending on what iPhone files you wish to see on your Mac. The following examples demonstrate how to access your iPhone’s files on your computer using some of these programs.
Step 1: Select System Preferences from the Apple logo in the top-left corner of your screen.
Step 2: To manage your iCloud account on your Mac, pick the iCloud option on the following page.
Step 3: On the right-hand panel, you’ll see a list of all the file types you can download from iCloud and access on your computer. Please make a list of all the file types you wish to see and check them off.
Step 4: If you wish to access your iPhone’s picture files on Mac, open the Photos app and choose all the synchronized material.
Step 5: To access your iPhone notes, open the Notes app on your computer, and all of your iPhone notes will appear.
On a Mac, use the iCloud Web Version to access iPhone files.
If you don’t want to utilize the standard applications on your Mac to see your iPhone’s files, another option is to use the iCloud online version. You can access your synced files using iCloud’s online version, which you can access from any web browser.
Safari, Chrome, Firefox, or any other browser you have installed should function. You’ll be able to view all of the files you’ve selected to share with your iCloud account from your iPhone. You may also download some of these files to Mac if you desire.
The steps below should show you how to use the iCloud online version to access your iPhone’s files on your computer.
Step 1: Open your Mac’s browser and go to the iCloud website. Sign in with the same iCloud account you used to set up your iPhone. When the main interface displays, you may access your files by clicking on any choices. Click on the Images option, for example, if you want to see your iPhone’s photos.
Step 2: To see your iPhone’s reminder files, choose Reminders from the menu bar, and you’ll see all of your iPhone’s reminders on your Mac.
FAQs

Is It Permissible To Delete iOS Files From A Mac?
Yes. These files indicated in iOS Installers are safe to remove since they are the last version of iOS you installed on your iDevice (s). They’re utilized to restore your iDevice without requiring a download if iOS hasn’t been updated recently.
On A Mac Catalina, How Can I See All Of My Files?
For my virtual dollar, All My Files is one of the most helpful tools in the Finder. It lists all of the files on your Mac in chronological order, starting with the most recent. It’s at a little concealed location. Select Finder > Preferences > Sidebar from the Finder menu bar.
How Can I Find All Of My Files On A Mac?
- Open a new window in the Finder.
- From the sidebar, choose “All My Files.”
- In the toolbar, click the Action icon. (Hint: it resembles a gear.)
- “Show Search Criteria” should be selected.
- You’ll be given a list of criteria that the Finder will use by default to locate all of the files on your system after you’ve done this.
Is It True That iPhone Backup Saves Photos?
An iTunes backup will keep practically everything on the iPhone, including images on the camera roll, as long as the shots were taken straight from the iPhone’s camera and not downloaded from a computer. See About backups for iOS devices for additional information about backups.
What’s The Best Way To Back Up Your Mac To Icloud?
Select Back Up Automatically from the Time Machine menu in System Preferences. Select the backup disk you wish to use, and you’re done. iCloud is a great way to back up your data.
iCloud Drive files and iCloud Photographs photos are automatically saved in iCloud and do not need to be included in your Time Machine backup.
What Can I Do To Free Up Space On My Mac?
How to manually clear up storage space
- Music, movies, and other forms of media may take up a lot of storage.
- Other files you no longer require may be deleted by putting them to the Trash and then emptying the Trash.
- Transfer files to an external hard drive.
- Files should be compressed.
Is It Possible To Remove Old iPhone Backups On A Mac?
Connect your iPhone or iPad to your Mac first, then launch the Finder software and choose your device from the sidebar. Select “Manage Backups” from the drop-down menu. All of the iPhone and iPad backups on the Mac will now be listed in the popup. After selecting a backup to remove, click the “Delete Backup” option.
Conclusion
Cleaning up your Mac’s storage space is safe and straightforward. We shared iOS files and some tips and tactics for freeing up more space on your Mac in this post. While there is a lot of software available today that claims to make disk cleanup simple, not all of it is trustworthy.
Lacoon hope you found this article helpful, and if you would like more information on this topic discussed, please don’t hesitate to contact us.